Well that was the plan anyway. The badge removal is not going as smoothly as usual. I am assuming the cold is the culprit here too. Since I already had ordered three new rectangular badges,
I wasn't too worried about ruining the ones I was taking off since I had the remade ones available if need be. Well, they got slightly damaged on removal as the steel drive screws just would not cooperate. I PB Blasted them overnight but still no luck. I had to use the Dremel to remove the heads and pry the badge off. I left enough protruding so that hopefully after another night of PB Blaster, they will unscrew when I grab them with the vise grips.
Note how the drive screws are protruding. Some heat from the torch tomorrow and some elbow grease and hopefully they come out, they usually do. Drilling new holes is not an easy option, I much prefer to use the original holes.
Since I could not work on the arm I decided to take all the masking off the painted parts and chase the threaded holes to remove any over spray and or dirt and grime that had accumulated in them.
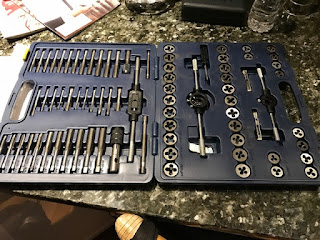
Chasing threads is not hard but you must be careful so as not to ruin the existing threads. A used set of taps are perfectly fine for this job. I bought a set on eBay for just this purpose. $12 bucks plus $5 shipping and it turned out to be an almost new set of Mastercraft tap and dies.
The parts I worked on were
- Motor mounts
- Carriage
- Elevation handle
- Carriage end bearing holders
- Carriage stop
I find it best to have some bolts with the proper threads to test the holes prior to starting. The GE parts list tells you the sizes or you can just test with some bolts you have in the shop. The carriage set screws are 1/4-20 threads. I had some 2" 1/4-20 cap head screws so I used one to thread into each hole.
This loosens up any dirt, then I thread the tap into the hole carefully and use the handle if necessary.
Most times you should NOT need the handle, you should be able to screw the tap to the end of the hole and unscrew it back out. All the dirt comes out with the tap, so clean it after each thread cleaning.
While I was cleaning the set screw holes, I found some more brass set screw shims.
These little brass discs go into the hole under the set screw. The soft brass, when pressed against the threads doesn't damage the threads as much as a steel set screw end would. Don't lose them they are not easy to replace.
Here are all the parts I cleaned and all the tools I used.
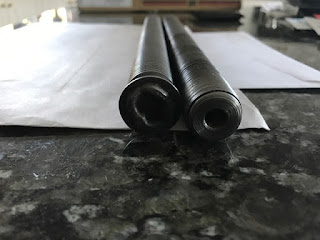
I also received the elevating screw I ordered from Bradley tools today. Unfortunately, it is not the same as the original one from my Long Arm. My original is the top one in the photo, it is longer than the replacement and has a taper pin hole in the threads, which are also shorter than the replacement.
Additionally, the original has a threaded hole in the center of the top of the screw, this is for the bolt that holds the centering cap. The replacement was not machined for this. I had to send it back.
When I return to the north I will be wiring up the motor to the starter to see if I can Part 4A finished for all of you and hopefully I can remove those arm badge drive screws tomorrow. For now. I am just waiting for the last coat of paint to dry on the motor and I've installed the new badge on the magnetic starter box.
Here are all the tools required to install the badge back on the starter box. I used #6-1/4" drive screws. Just sit them in the hole and bang them in with a small steel hammer.
And here it is with badge installed. The hole is for the starter reset button. I am touching up the "reset" in the button with white paint. I need to epoxy it to a small flat rectangular piece of acrylic to replace the rotten wood piece it was glued to, which I'm sure wasn't original.
Since the arm won't fit in my sandblast cabinet, I tested an area with Citri-Strip. As you can see, it only removed the top layer of paint, the original machine grey is what you see under the old brown.
I am going to have to set up my exterior sandblaster to clean this up I think. I'll try Citri-Strip on the exposed grey first and see what that does.
The next post won't be for a week or so. See you then.


