I cleaned all the bearings off with the compressor and the jet nozzle. I then sprayed them again with PB Blaster. The bearings come off quite easily in most cases. I start them off by squeezing a medium screwdriver behind them and twisting it up. This gets the bearing shaft moving out of its hole and usually you just pull them out by hand at this point. If not, I use a small three jaw puller (OTC part number 1021). This is a smaller puller and ideal for these size bearings. It is a $20 tool that is well worth the expense.

Important: On some models there are small, solid brass shims under the set screws that attach to the threaded bearing shafts. Don't lose them, they are hard to replace. They generally fall out when you pull the shaft and the bearing out of its hole.
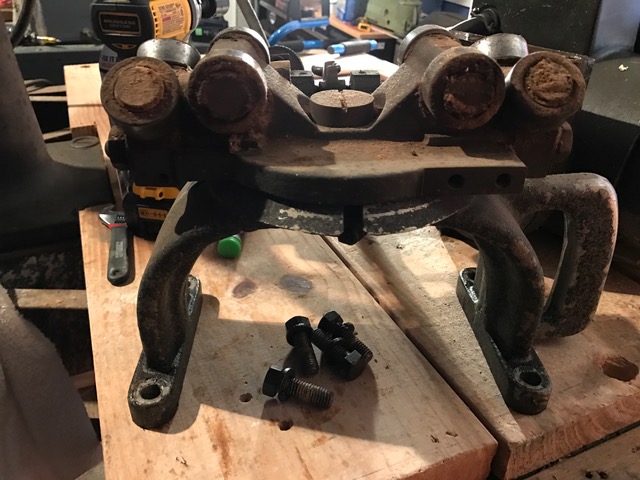
You will not be able to get the top bearing by the lock knob off without removing the knob.
This is a tricky knob to remove. Facing the knob, loosen the left side bolt which has the left side shaft for the bevel. Then unscrew the right side as far as you can. You can now remove the clamp. You will notice that you CANNOT remove the right side bolt by unscrewing it as the shaft won't fit the threaded hole. The way you get that out is by screwing it all the way out thru the left side. A long flat head bit in your screw gun works very well to do this.
Once you have the bearing shafts off, it is time to separate the bearings from the shafts. There is a thin shim washer on each bearing shaft, be careful not to damage or lose them.

Once removed the washers and shafts can be soaked in WD-40 for a while; then cleaned and polished. There is a lot of talk about restoring old bearings, I'm not in favor of that. The difference in operation of new bearings versus restored bearings is DEFINTELY noticeable, restored bearings will last maybe a year before you have to do it again, the time & materials spent soaking, cleaning, re-greasing and installing the restored bearings isn't all that much cheaper than buying new ones. If you really want to talk about cost differential, all that has to be considered.
Once I got all the bearings removed from the bearing shafts I cleaned them thoroughly, including using a Q-Tip to clean the little recesses at the end of the shafts.

Now those are going to function a heck of a lot better than the way there were, all crudded up with rust and sawdust muck!
I then started to clean all the hardware I had removed so far from the yoke, motor and carriage.
I soaked all the parts in a mixture of WD-40 and white vinegar. Here are some of the parts waiting to be cleaned.

Here is where I was sitting while I cleaned all the parts. Nice place to do this work.

To clean the parts and hardware I used a combination of emory paper, small wire brush, a flap wheel, buff wheel and wire brush on a small cordless drill and scotch brite.
Here are some of the parts cleaned and ready to go. ALL PARTS ONCE REMOVED FROM THE MACHINE SHOULD BE BAGGED AND TAGGED!. And immediately after cleaning they go right back in the bag.

Light not so good on the picture above, trust me they are nice and clean.

I am painting this restoration in a USA theme, red, white and blue. The base, column base and arm will be white, the yoke and motor will be blue and all handles and the arm end cap will be red. I thought the end cap being red would contrast nicely with the white arm and the black on/off button switch that insets into the cap.
Here are some before and after handle pictures.


The shafts of these crank handles will remain white, the actual handle will be painted red although I am toying with the idea of dipping them in red plasti-dip so they have some grip on them. Love to hear comments on that.
The next post will cover the yoke and carriage cleaning, the cleanup of the magnetic starter box; including all new wiring and some motor work.
Nice job on the restoration! Did you soak the bearing and shaft before you separated them?
ReplyDeleteIf you are referring to the rollerhead bearings, the answer is no. It is not necessary unless you see visible rust on the bearing shafts. With a puller, they come right off.
ReplyDelete